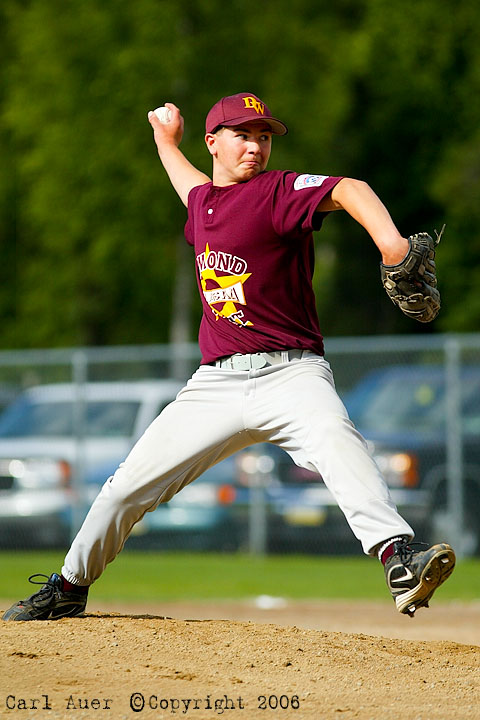
 When shooting baseball, there are two constants on who will have the ball. The pitcher and the catcher. There is no guarantee that any other player is going to touch the ball. Ok, so you have a good chance of everyone touching the ball unless the pitcher throws a perfect game, but even then, you best opportunity for action in a baseball game is the pitcher. The photo I posted here is a classic shot. The pitcher is starting his delivery. The ball is back behind him, he is kicking his front leg out and throwing his gloved hand to help deliver the ball. When shooting a pitcher there are really only two places to shoot him from that usually work. One, behind the plate, usually through the fence, or facing him. For a right handed pitcher, that would be shooting from third base, and for a left handed pitcher, that would be 1st base. This shot, from Third base shows the viewer exactly what is going on. While the background is bad with parked cars, you are not drawn to it because of the subject and the peak action of the pitch. Pitchers offer numerous shooting chances. Watch a pitcher deliver a pitch a few times. Watch for leg kicks, followthrough, emotion, little things can end up making for a great photo. If this pitcher would have a follow through that would turn him around after throwing the ball, I could still shoot him from the opposite side and get an interesting shot, and if he has a wide stretch, from the back side can also be interesting to the viewer. But unless there is a runner on the base to his back, shooting a pitcher from his back side is usually not something to focus on. Now if there is a runner on first for a pitcher like this, typically they will look over to first. This can be a great opportunity for a shot from the off side. Also, if he makes a move to pick off that runner, he will have to face you to do that, so that gives you another photographic opportunity. Also, watch for things between pitches. I have seen pitchers walk around the mound, chat with the catcher, and show some great emotion after delivering a strike three pitch, or a pitch that is called a ball that he thought was a strike. While sad, a pitcher can offer great photo ops after serving up a home run ball, or struggling through a inning, so keep your eyes open for those chances. Also, do not focus just on the pitcher. Since he is the one who touches the ball all the time, it can be easy to take too many pictures of them. I will usually approach a pitcher the following way.
Two straight series of him throwing. At 8fps, I will shoot a burst of 4 to 5 images. Then a third series of him doing the same thing, but at a slower shutter speed to look for movement, a sense of speed in his throw. I will then get shots through the backstop looking straight at him, then I will look for pick offs when a runner is on base. That will usually do it for the pitcher for me. This allows me to get photos of the pitcher out of the way and focus on the other players.
A hint for shooting baseball is anticipation and odds. Keep track of what the players are doing. The batters will face each pitcher a few times, so each time up, keep track of where they hit the ball. If the 4th batter hit a grounder to third base his first two times up, focus in on the third baseman and hope he hits it there a third time. Sometimes he will, sometimes he wont. When a runner is on first, anticipate a double play or a steal. I will prefocus on 2nd base and then if it is a double play I am already set for the out at second and the throw back to first. This is the best way to get those sharp shots of a shortstop in the air throwing the ball as a runner is sliding into second. Baseball is one sport that if you shoot, know the game. For little league, keep track of what the batters are doing and where they hit, but for higher level, like college or the pros, typically there is a radio broadcast you can listen to on a portable radio (I will use one earplug) and usually the announcers will say things like;
"The last time up he grounded to second and in his first at bat he hit a line drive to right."
That info would tell me he likes to hit to the right side of the diamond, so I will focus in on the second baseman and hope for a line drive he has to dive for, or maybe a ball hit softly that he needs to charge in to pick up.
